
Releases
Unlock Enhanced System Management with VitalPBX 4.1.0 R1
The VitalPBX team is thrilled to announce the rollout of VitalPBX 4.1 R1, a significant update that brings cutting-edge features and improvements to your communication


Asterisk WebRTC (Web Real-Time Communication) es un proyecto gratuito de código abierto que proporciona navegadores web y aplicaciones móviles con comunicaciones en tiempo real (RTC) a través de interfaces de programación de aplicaciones (API) simples.
Permite que la comunicación de audio y video funcione dentro de las páginas web al permitir la comunicación directa entre pares, eliminando la necesidad de instalar complementos o descargar aplicaciones nativas.
Con el apoyo de Apple, Google, Microsoft, Mozilla y Opera, las especificaciones de WebRTC han sido publicadas por el Consorcio World Wide Web (W3C) y el Grupo de Trabajo de Ingeniería de Internet (IETF)..
Este tutorial lo guiará a través de la configuración de Asterisk para dar servicio a los clientes WebRTC.
Primero, actualizamos nuestra instalación de CentOS 7 e instalamos algunas dependencias.
|
[root@localhost ~]# yum install wget nano git epel-release -y |
Deshabilitar SELinux en CentOS
|
[root@localhost ~]# sed -i s/^SELINUX=.*$/SELINUX=disabled/ /etc/selinux/config [root@localhost ~]# reboot |
A continuación, instale el cortafuegos (Firewall)
|
[root@localhost ~]# yum install firewalld -y [root@localhost ~]# systemctl enable firewalld [root@localhost ~]# systemctl start firewalld |
Habilite los puertos requeridos
|
[root@localhost ~]# firewall-cmd –zone=public –add-port=10000-20000/udp –permanent [root@localhost ~]# firewall-cmd –zone=public –add-port=10000-20000/tcp –permanent [root@localhost ~]# firewall-cmd –zone=public –add-port=8089/tcp –permanent [root@localhost ~]# firewall-cmd –zone=public –add-port=443/tcp –permanent [root@localhost ~]# firewall-cmd –zone=public –add-port=80/tcp –permanent [root@localhost ~]# firewall-cmd –zone=public –add-port=22/tcp –permanent [root@localhost ~]# firewall-cmd –reload |
Ahora, habilitamos seguridad adicional para el acceso ssh. Cambiamos el puerto realizando los siguientes pasos. (Opcional)
|
[root@localhost ~]# nano /etc/ssh/sshd_config # $OpenBSD: sshd_config,v 1.100 2016/08/15 12:32:04 naddy Exp $ # This is the sshd server system-wide configuration file. See # sshd_config(5) for more information. # This sshd was compiled with PATH=/usr/local/bin:/usr/bin # The strategy used for options in the default sshd_config shipped with # OpenSSH is to specify options with their default value where # possible, but leave them commented. Uncommented options override the # default value. # If you want to change the port on a SELinux system, you have to tell # SELinux about this change. # semanage port -a -t ssh_port_t -p tcp #PORTNUMBER # Port 2235 #AddressFamily any #ListenAddress 0.0.0.0 #ListenAddress :: |
Descomente la línea #Port 22 y cambie el puerto a uno de su preferencia.
Ahora agregue la nueva regla con el nuevo puerto y reinicie el servicio sshd e inicie sesión con el nuevo puerto.
|
[root@localhost ~]# firewall-cmd –zone=public –add-port=2235/tcp –permanent [root@localhost ~]# firewall-cmd –reload [root@localhost ~]# systemctl restart sshd |
Ahora iniciamos el proceso de instalación de Asterisk 18
|
[root@localhost ~]# cd /usr/src/ [root@localhost src]# wget http://downloads.asterisk.org/pub/telephony/asterisk/asterisk-18-current.tar.gz [root@localhost src]# tar -zxvf asterisk-18-current.tar.gz [root@localhost src]# cd asterisk-18.* [root@localhost asterisk-18.6.0]# yum install svn -y [root@localhost asterisk-18.6.0]# ./contrib/scripts/get_mp3_source.sh [root@localhost asterisk-18.6.0]# contrib/scripts/install_prereq install [root@localhost asterisk-18.6.0]# ./configure –libdir=/usr/lib64 –with-jansson-bundled –with-pjproject-bundled |
Al final de la compilación de Asterisk aparece lo siguiente

Luego, procedemos con make menuselect
|
[root@localhost asterisk-18.6.0]# make menuselect |
Nos aseguramos de que en el códec “codec_opus” esté seleccionado. Luego de seleccionar todo lo que necesitamos, procedemos a Guardar y Salir.
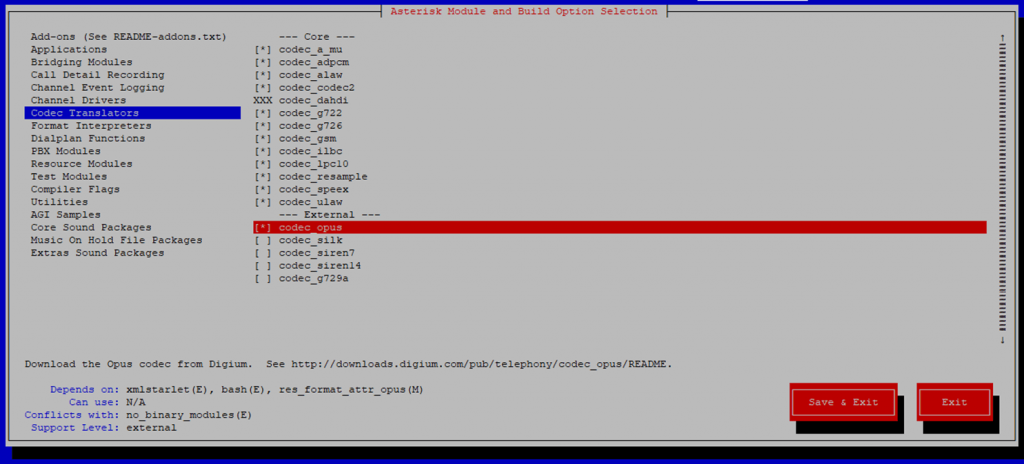
Ahora procederemos a instalar Asterisk, espere unos 10 minutos.
|
[root@localhost asterisk-18.6.0]# make && make install [root@localhost asterisk-18.6.0]# make samples [root@localhost asterisk-18.6.0]# make config |
Cree un usuario y un grupo separados para ejecutar servicios de Asterisk y asigne los permisos correctos.
|
[root@localhost asterisk-18.6.0]# groupadd asterisk [root@localhost asterisk-18.6.0]# useradd -r -d /var/lib/asterisk -g asterisk asterisk [root@localhost asterisk-18.6.0]# usermod -aG audio,dialout asterisk [root@localhost asterisk-18.6.0]# chown asterisk. -R /etc/asterisk [root@localhost asterisk-18.6.0]# chown asterisk. -R /var/{lib,log,spool}/asterisk [root@localhost asterisk-18.4.0]# chown -R asterisk.asterisk /usr/lib64/asterisk |
Establezca el usuario predeterminado de Asterisk.
|
[root@localhost asterisk-18.6.0]# nano /etc/sysconfig/asterisk AST_USER=”asterisk” AST_GROUP=”asterisk” |
Reinicie el servicio de Asterisk después de realizar los cambios.
|
[root@localhost asterisk-18.6.0]# chkconfig asterisk on [root@localhost asterisk-18.6.0]# systemctl restart asterisk [root@localhost asterisk-18.6.0]# asterisk -rvvvvvvvvvvvvvvvvvvv Asterisk 18.6.0, Copyright (C) 1999 – 2021, Digium, Inc. and others. Created by Mark Spencer markster@digium.com Asterisk comes with ABSOLUTELY NO WARRANTY; type ‘core show warranty’ for details. This is free software, with components licensed under the GNU General Public License version 2 and other licenses; you are welcome to redistribute it under certain conditions. Type ‘core show license’ for details. ========================================================================= Connected to Asterisk 18.6.0 currently running on localhost (pid = 91658) localhost*CLI> |
¡FELICIDADES! Ha instalado correctamente Asterisk 18.
Instale Apache para habilitar el acceso web a nuestro servidor.
|
[root@localhost ~]# yum install httpd -y [root@localhost ~]# systemctl enable httpd [root@localhost ~]# systemctl start httpd |
Creamos un sitio web temporal con nuestro dominio (nuestro ejemplo es: wrtc.new.vitalpbx.org).
A lo largo de este tutorial, debe sustituir el dominio wrtc.new.vitalpbx.org por el suyo.
|
[root@localhost ~]# mkdir -p /var/www/html/mydomain.com/{public_html,logs} [root@localhost ~]# nano /etc/httpd/conf.d/mydomain.com.conf NameVirtualHost *:80 <VirtualHost *:80> ServerAdmin webmaster@mydomain.com ServerName mydomain.com ServerAlias mydomain.com DocumentRoot /var/www/html/mydomain.com/public_html/ ErrorLog /var/www/html/mydomain.com/logs/error.log CustomLog /var/www/html/mydomain.com/logs/access.log combined </VirtualHost> |
Reiniciamos nuestro Apache.
|
[root@localhost ~]# systemctl restart httpd |
Primero, tenemos que asegurarnos que nuestro dominio o subdominio apunte a la dirección IP de nuestro servidor, para ello nos dirigimos a la configuración de nuestro DNS y agregamos un registro tipo A.
Ahora procederemos a crear nuestro certificado, instalando primero las dependencias.
|
[root@localhost ~]# yum install certbot python2-certbot-apache mod_ssl -y |
Ahora creamos nuestro certificado LetsEncrypt.
|
[root@localhost ~]# certbot ––apache -d mydomain.com Saving debug log to /var/log/letsencrypt/letsencrypt.log Plugins selected: Authenticator apache, Installer apache Enter email address (used for urgent renewal and security notices) (Enter ‘c’ to cancel): |
Proporcionar un correo electrónico para ser notificado de la caducidad del certificado.
|
Starting new HTTPS connection (1): acme-v02.api.letsencrypt.org Please read the Terms of Service at https://letsencrypt.org/documents/LE-SA-v1.2-November-15-2017.pdf. You must agree in order to register with the ACME server. Do you agree? – – – – – – – – – – – – – – – – – – – – – – – – – – – – – – – – – – – – – – – – – (Y)es/(N)o: |
Responda Y para continuar
|
– – – – – – – – – – – – – – – – – – – – – – – – – – – – – – – – – – – – – – – – Would you be willing, once your first certificate is successfully issued, to share your email address with the Electronic Frontier Foundation, a founding partner of the Let’s Encrypt project and the non-profit organization that develops Certbot? We’d like to send you email about our work encrypting the web, EFF news, campaigns, and ways to support digital freedom. – – – – – – – – – – – – – – – – – – – – – – – – – – – – – – – – – – – – – – – – (Y)es/(N)o: |
Responda Y para continuar
Al final vemos el siguiente mensaje confirmando que todo es correcto.
|
Account registered. Requesting a certificate for mydomain.com Performing the following challenges: http-01 challenge for mydomain.com Waiting for verification… Cleaning up challenges Created an SSL vhost at /etc/httpd/conf.d/mydomain.com-le-ssl.conf Deploying Certificate to VirtualHost /etc/httpd/conf.d/ mydomain.com-le-ssl.conf Redirecting vhost in /etc/httpd/conf.d/mydomain.com.conf to ssl vhost in /etc/httpd/conf.d/ mydomain.com-le-ssl.conf – – – – – – – – – – – – – – – – – – – – – – – – – – – – – – – – – – – – – – – – Congratulations! You have successfully enabled https://mydomain.com – – – – – – – – – – – – – – – – – – – – – – – – – – – – – – – – – – – – – – – – Subscribe to the EFF mailing list (email: support@mydomain.com). Starting new HTTPS connection (1): supporters.eff.org We were unable to subscribe you the EFF mailing list because your e-mail address appears to be invalid. You can try again later by visiting https://act.eff.org. IMPORTANT NOTES: – Congratulations! Your certificate and chain have been saved at: /etc/letsencrypt/live/mydomain.com/fullchain.pem Your key file has been saved at: /etc/letsencrypt/live/mydomain.com/privkey.pem Your certificate will expire on 2021-09-14. To obtain a new or tweaked version of this certificate in the future, simply run certbot again with the “certonly” option. To non-interactively renew *all* of your certificates, run “certbot renew” – If you like Certbot, please consider supporting our work by: Donating to ISRG / Let’s Encrypt: https://letsencrypt.org/donate Donating to EFF: https://eff.org/donate-le [root@localhost ~]# |
Anotamos la ruta de ambos certificados, ya que los usaremos más adelante.
Modificar el archivo /etc/httpd/conf.d/ssl.conf
|
[root@localhost ~]# mv /etc/httpd/conf.d/ssl.conf /etc/httpd/conf.d/ssl.conf.bak [root@localhost ~]# nano /etc/httpd/conf.d/ssl.conf Listen 443 https SSLPassPhraseDialog exec:/usr/libexec/httpd-ssl-pass-dialog SSLSessionCache shmcb:/run/httpd/sslcache(512000) SSLSessionCacheTimeout 300 SSLRandomSeed startup file:/dev/urandom 256 SSLRandomSeed connect builtin |
|
[root@localhost ~]# mv /etc/httpd/conf.d/welcome.conf /etc/httpd/conf.d/welcome.conf.bak [root@localhost ~]# mv /etc/httpd/conf.d/mydomain.com.conf /etc/httpd/conf.d/mydomain.com.conf.bak |
Deshabilitar otros sitios
Recargar el servicio Apache
|
[root@localhost ~]# systemctl reload-or-restart httpd |
Configurar renovación automática
Ahora que certbot está instalado y funcionando, debemos hacer que verifique los certificados que caducan automáticamente. Como root, primero abrimos el crontab para nuestro servidor.
|
[root@localhost ~]# crontab -e |
Presione Insertar
En este caso, agregué un cron a nuestro servidor de ejemplo que se ve así.
|
45 3 * * 6 /usr/local/letsencrypt/certbot-auto renew && systemctl reload httpd |
Guardar con Esc, :wq
Este cron, a las 3:45 AM Todos los sábados, ejecutará la función de renovación de certbot para renovar los certificados ya instalados que vencen, y luego volverá a cargar la configuración de Apache. Guarde el crontab después de agregar esta línea, y entrará en vigencia de inmediato.
Debería tener una instalación de Asterisk basada en chan_pjsip que funcione. Instale Asterisk desde los paquetes de su distribución o, preferiblemente, instale Asterisk desde la fuente. De cualquier manera, hay algunos módulos además de los estándar que deben estar presentes para que WebSockets y WebRTC funcionen.
Recomendamos instalar Asterisk desde la fuente porque es fácil asegurarse de que estos módulos estén construidos e instalados.
Técnicamente, un cliente puede usar WebRTC a través de un WebSocket inseguro para conectarse a Asterisk. Sin embargo, en la práctica, la mayoría de los navegadores requerirán el uso de un WebSocket basado en TLS.
Puede usar certificados autofirmados para configurar el servidor TLS de Asterisk, pero lograr que los navegadores los acepten es complicado. Entonces, si puede, le recomendamos que obtenga certificados confiables de una organización como LetsEncrypt.
Como el objetivo de esta presentación no es enseñar cómo instalar un certificado con LetsEncrypt, te recomendamos el siguiente enlace para hacerlo tú mismo.
https://www.tecmint.com/install-lets-encrypt-ssl-certificate-to-secure-apache-on-rhel-centos/
Para comunicarse con los clientes de WebSocket, Asterisk utiliza su servidor HTTP integrado. Entonces configuramos lo siguiente.
|
[root@localhost ~] mv /etc/asterisk/http.conf /etc/asterisk/http.conf.bak [root@localhost ~] nano /etc/asterisk/http.conf [general] servername=Asterisk tlsbindaddr=0.0.0.0:8089 bindaddr=0.0.0.0 bindport=8088 enabled=yes tlsenable=yes tlscertfile=/etc/letsencrypt/live/mydomian.com/fullchain.pem tlsprivatekey=/etc/letsencrypt/live/mydomain.com/privkey.pem |
Aunque el servidor HTTP hace el trabajo pesado para WebSockets, todavía necesitamos definir un transporte PJSIP básico.
|
[root@localhost ~] mv /etc/asterisk/pjsip.conf /etc/asterisk/pjsip.conf.bak [root@localhost ~] nano /etc/asterisk/pjsip.conf [system] type=system timer_t1=500 timer_b=32000 disable_tcp_switch=yes [global] type=global max_initial_qualify_time=0 keep_alive_interval=90 contact_expiration_check_interval=30 default_voicemail_extension=*97 unidentified_request_count=3 unidentified_request_period=5 unidentified_request_prune_interval=30 mwi_tps_queue_high=500 mwi_tps_queue_low=-1 mwi_disable_initial_unsolicited=yes send_contact_status_on_update_registration=yes [transport-wss] type=transport protocol=wss bind=0.0.0.0:8089 local_net=10.10.0.9/16 local_net=10.116.0.6/20 external_media_address=178.128.149.185 external_signaling_address=178.128.149.185 allow_reload=yes |
Reemplace local_net, external_media_address y external_signaling_address con sus respectivas direcciones IP.
Ahora necesitamos crear los objetos PJSIP básicos que representan al cliente. En este ejemplo, llamaremos al cliente webrtc_client, pero puede usar el nombre que desee, como un número de extensión. Solo se muestran las opciones mínimas necesarias para una configuración de trabajo.
NOTA: Es normal que varios objetos en pjsip.conf tengan el mismo nombre siempre que los tipos sean diferentes. Agregue el siguiente contenido al final del archivo.
|
[root@localhost ~] nano /etc/asterisk/pjsip.conf [webrtc-phones](!) context=main-context transport=transport-wss allow=!all,opus,ulaw,alaw,vp8,vp9 webrtc=yes [User1](webrtc-phones) type=endpoint callerid=”User One” <100> auth=User1 aors=User1 [User1] type=aor max_contacts=3 [User1] type=auth auth_type=userpass username=User1 password=1234 [User2](webrtc-phones) type=endpoint callerid=”User Two” <101> auth=User2 aors=User2 [User2] type=aor max_contacts=3 [User2] type=auth auth_type=userpass username=User2 password=1234 [User3](webrtc-phones) type=endpoint callerid=”User Three” <102> auth=User3 aors=User3 [User3] type=aor max_contacts=3 [User3] type=auth auth_type=userpass username=User3 password=1234 |
Cambiamos el propietario del archivo a Asterisk.
|
[root@localhost ~] chown asterisk. /etc/asterisk/pjsip.conf |
UActualice /etc/asterisk/extensions.conf con lo siguiente.
|
[root@localhost ~] mv /etc/asterisk/extensions.conf /etc/asterisk/extensions.conf.bak
[root@localhost ~] nano /etc/asterisk/extensions.conf [general] static=yes writeprotect=yes priorityjumping=no autofallthrough=no [globals] ATTENDED_TRANSFER_COMPLETE_SOUND=beep [main-context] include => from-extensions include => subscriptions include => textmessages include => echo-test include => speak-exte-nnum [echo-test] exten => 777,1,NoOp(FEATURE: ECHO TEST) same => n,Answer same => n,Wait(1) same => n,Playback(demo-echotest) same => n,Echo() same => n,Playback(demo-echodone) same => n,Hangup() ;END of [echo-test] [speak-exte-nnum] exten => 888,1,NoOp(FEATURE: SPEAK MY EXTENSION NUMBER) same => n,Answer same => n,Wait(1) same => n,Playback(extension) same => n,Wait(1) same => n,SayDigits(${CALLERID(num)}) same => n,Wait(2) same => n,Hangup() ;END of [speak-exte-nnum] [textmessages] exten => 100,1,Gosub(send-text,s,1,(User1)) exten => 101,1,Gosub(send-text,s,1,(User2)) exten => 102,1,Gosub(send-text,s,1,(User3)) [subscriptions] exten => 100,hint,PJSIP/User1 exten => 101,hint,PJSIP/User2 exten => 102,hint,PJSIP/User3 [from-extensions] ; Feature Codes: exten => *65,1,Gosub(moh,s,1) ; Extensions exten => 100,1,Gosub(dial-extension,s,1,(User1)) exten => 101,1,Gosub(dial-extension,s,1,(User2)) exten => 102,1,Gosub(dial-extension,s,1,(User3)) exten => e,1,Hangup() [moh] exten => s,1,NoOp(Music On Hold) exten => s,n,Ringing() exten => s,n,Wait(2) exten => s,n,Answer() exten => s,n,Wait(1) exten => s,n,MusicOnHold() [dial-extension] exten => s,1,NoOp(Calling: ${ARG1}) exten => s,n,Set(JITTERBUFFER(adaptive)=default) exten => s,n,Dial(PJSIP/${ARG1},30) exten => s,n,Hangup() exten => e,1,Hangup() [send-text] exten => s,1,NoOp(Sending Text To: ${ARG1}) exten => s,n,Set(PEER=${CUT(CUT(CUT(MESSAGE(from),@,1),<,2),:,2)}) exten => s,n,Set(FROM=${SHELL(asterisk -rx ‘pjsip show endpoint ${PEER}’ | grep ‘callerid ‘ | cut -d’:’ -f2- | sed ‘s/^ *//’ | tr -d ‘ ‘)}) exten => s,n,Set(CALLERID_NUM=${CUT(CUT(FROM,>,1),<,2)}) exten => s,n,Set(FROM_SIP=${STRREPLACE(MESSAGE(from), exten => s,n,MessageSend(pjsip:${ARG1},${FROM_SIP}) exten => s,n,Hangup() |
Cambiamos el propietario del archivo para que sea asterisk
|
[root@localhost ~] chown asterisk. /etc/asterisk/extensions.conf |
Reinicie Asterisk para aplicar los cambios y, si tiene un firewall, no olvide permitir el paso del puerto TCP 8089 para que su cliente pueda conectarse.
|
[root@localhost ~] asterisk -rvvvvvvvvvvvvvvvvvv localhost*CLI> module reload res_pjsip.so localhost*CLI> dialplan reload |
Verifique que el certificado se aplique correctamente.
|
localhost*CLI> module reload http localhost*CLI> http show status HTTP Server Status: Prefix: Server: Asterisk Server Enabled and Bound to 0.0.0.0:8088 HTTPS Server Enabled and Bound to 0.0.0.0:8089 Enabled URI’s: /httpstatus => Asterisk HTTP General Status /phoneprov/… => Asterisk HTTP Phone Provisioning Tool /metrics/… => Prometheus Metrics URI /ari/… => Asterisk RESTful API /ws => Asterisk HTTP WebSocket Enabled Redirects: None. |
En este punto, su cliente WebRTC debería poder registrarse y realizar llamadas. Sin embargo, si ha utilizado certificados autofirmados, es posible que su navegador no permita la conexión y, dado que el intento no proviene de un URI normal proporcionado por el usuario, es posible que ni siquiera se le notifique que hay un problema.
Es posible que pueda hacer que el navegador acepte el certificado visitando “https://pbx.example.com:8089/ws” directamente. Por lo general, esto dará como resultado una advertencia del navegador y puede darle la oportunidad de aceptar el certificado autofirmado y/o crear una excepción.
Si generó su certificado a partir de una autoridad certificadora local preexistente, también puede importar el certificado de esa autoridad certificadora en su tienda de confianza, pero ese procedimiento está fuera del alcance de este documento.
**Fuente de información.
Para esta presentación decidimos utilizar Browser Phone que a nuestro criterio es uno de los mejores y más completos proyectos de código abierto de Asterisk WebRTC Cliente.
Esta aplicación web está diseñada para funcionar con Asterisk PBX (v13, v16 y v18). Una vez cargada, la aplicación se conectará a Asterisk PBX en su zócalo web y registrará una extensión.
Las llamadas se realizan entre contactos y se guarda un detalle completo de la llamada. Las llamadas de audio se pueden grabar. Las videollamadas se pueden grabar y guardar con 5 diseños de grabación diferentes y 3 configuraciones de calidad diferentes.
Esta aplicación no utiliza ningún sistema o servicio en la nube y está diseñada para ser independiente. Se descargarán bibliotecas adicionales en tiempo de ejecución (pero también se pueden guardar en el servidor web para una solución completa fuera de línea).
Asterisk PBX versión 13 | 16 | 17 | 18 (con Websockets y mensajería de texto, chan_sip o chan_pjsip).
Nos movemos a la carpeta html y copiamos el proyecto en la misma.
|
[root@localhost ~] cd /var/www/html/mydomain.com/public_html/ [root@localhost ~] git clone https://github.com/InnovateAsterisk/Browser-Phone.git |
Dar los permisos
|
[root@localhost ~] chown -R apache:apache /var/www/html/mydomain.com/public_html/ |
https://mydomain/Browser-Phone/Phone/
Ingresamos los siguientes datos y le damos Guardar. Asegúrese de escribir todos los datos, incluido el valor /ws en WebSocket Path.
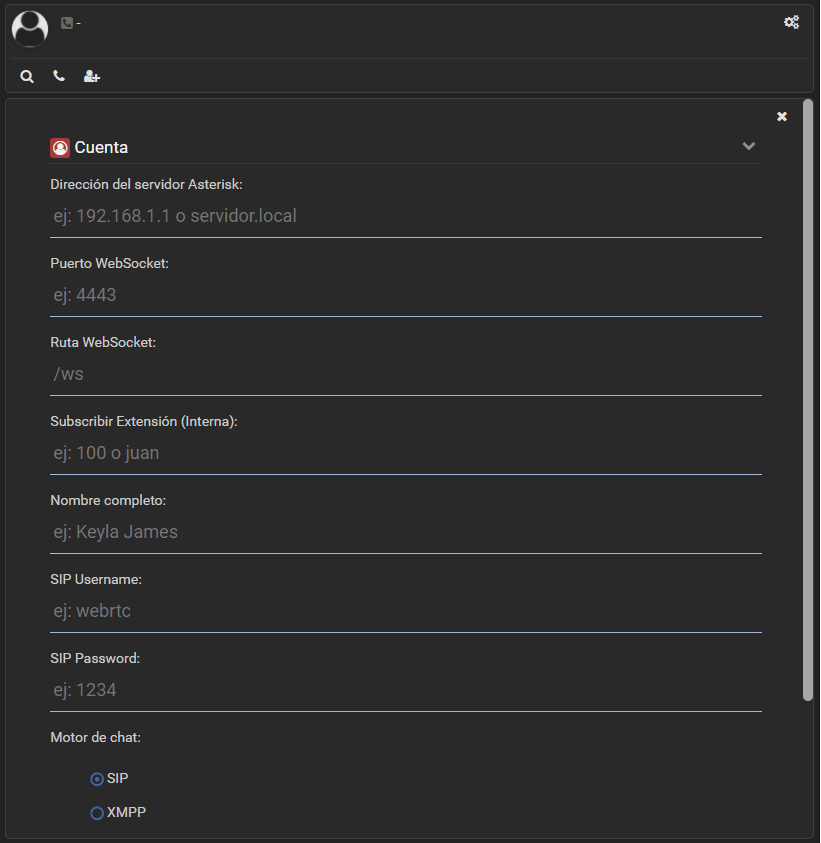
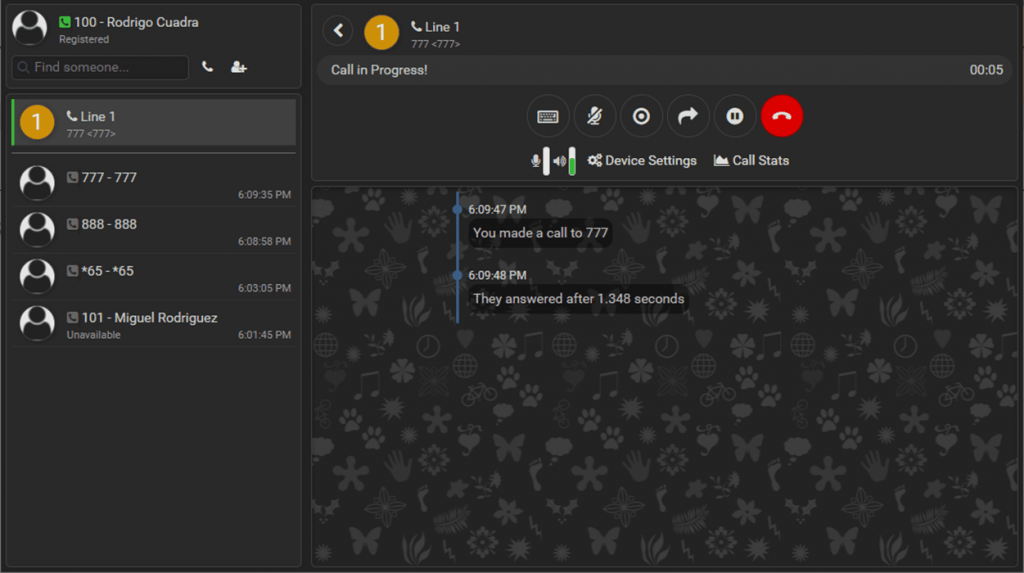
Después de presionar Guardar, su cuenta registrada debería aparecer en la parte superior izquierda.
A continuación, mostramos una imagen de cómo debería verse la extensión 100 registrada con una llamada en curso.
The VitalPBX team is thrilled to announce the rollout of VitalPBX 4.1 R1, a significant update that brings cutting-edge features and improvements to your communication

PBX System Recognized for Industry Innovation Miami, Florida, 02/27/24 — VitalPBX announced today that TMC, a global, integrated media company, has named VitalPBX Unified Communications

Introduction The Private Branch Exchange, or PBX, has been a fundamental pillar in business communication for decades. As technology has advanced, so have the capabilities