
Releases
Unlock Enhanced System Management with VitalPBX 4.1.0 R1
The VitalPBX team is thrilled to announce the rollout of VitalPBX 4.1 R1, a significant update that brings cutting-edge features and improvements to your communication

The first one that we are going to test and that is already available is Digital Ocean, which has a very competitive price, is one of the easiest to install and also has a powerful firewall that will provide the security required to your hosted pbx.
Digital Ocean offers us $ 100.00 of courtesy credit to be used within 60 days, that is to say we can try Digital Ocean without investing a single penny and also use it for two months. This is a great offer you cannot ignore. To obtain this offer you can go to the following link:
Digital Ocean gives you $ 100.00 in credit
Once the account is created we must go to the Marketplace in the menu on the left and search for VitalPBX and then create a Droplet by pressing the Create VitalPBX Droplet button.

Later we choose the plan; we recommend Standard.
Now, we will see different virtual machine capacities, which one are we going to choose? That depends on our budget and the capacity in quantity of extensions that we want to configure, then, we are shown a table of recommendations
| Price | CPU | Memory GB | SSD GB | Transfer TB | Extensions |
|---|---|---|---|---|---|
| $ 5.00 | 1 | 1 | 25 | 1 | 50 |
| $ 10.00 | 2 | 2 | 50 | 2 | 100 |
| $ 15.00 | 3 | 3 | 60 | 3 | 150 |
| $ 15.00 | 2 | 2 | 60 | 3 | 100 |
| $ 15.00 | 1 | 1 | 60 | 3 | 50 |
| $ 20.00 | 4 | 4 | 80 | 4 | 250 |
| $ 40.00 | 4 | 8 | 160 | 5 | 250 |
| $ 80.00 | 6 | 16 | 320 | 6 | 400 |
| $ 160.00 | 8 | 32 | 640 | 7 | 500 |
| $ 240.00 | 12 | 48 | 960 | 8 | 750 |
| $ 320.00 | 16 | 64 | 1,250 | 9 | 1000 |
| $ 480.00 | 20 | 96 | 1,880 | 10 | 1250 |
| $ 640.00 | 24 | 128 | 2,500 | 11 | 1500 |
| $ 960.00 | 32 | 192 | 3,750 | 12 | 2000 |
It is very important to take into account that Asterisk consumes CPU processing mainly for which the amount of CPU of each Virtual machine is taken as the main meter, however, we must also take into account the SSD capacity if we are going to record calls, for example, and if you are installing add-ons such as the Sonata Suite we recommend at least 2GB of RAM.
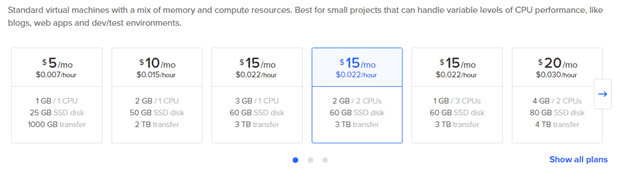
To perform your tests we recommend using the $ 15.00 plan that includes 2CPU and 2GB of RAM.
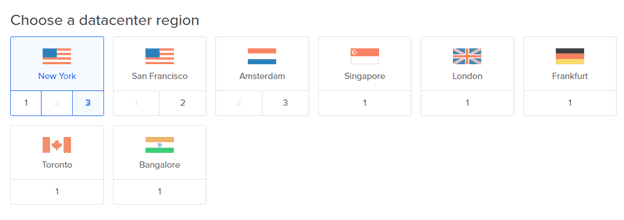
Once the Droplet is selected, we will choose the geographical area that best suits our location
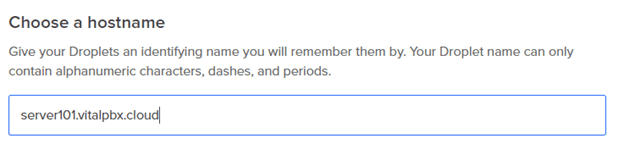
Finally, we recommend modifying the hostname with something easier to remember or something real if we have a domain or subdomain.
The other parameters are optional, now we will proceed to create our VitalPBX Server by pressing the green button at the bottom “Create Droplet”

You will have to wait until the droplet is finished creating. This process takes about 2 minutes. Once it is finished, press the link to our Droplet.

and verify the credentials to access.
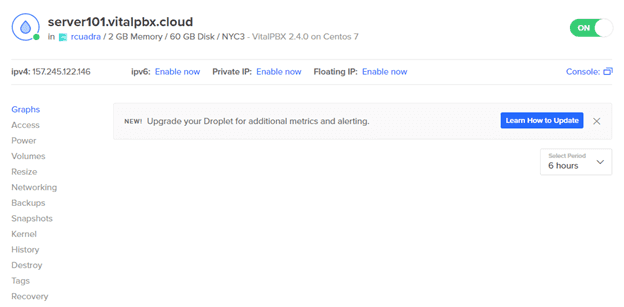
In this case our IP is 157.245.122.146, we type that IP Address in our browser, Google Chrome, Edge, etc. And the VitalPBX start menu will appear and we will create the admin password immediately.
If we want to configure the Digital Ocean External Firewall for our VitalPBX it is necessary to go to Networking and select the TAB “Firewalls” and create our own rules.
For more information, consult the Digital Ocean manuals.
If you want to add more options to your VitalPBX we recommend you visit our online store where we offer many products that we are sure will take your VitalPBX to another level:
It is very important to register and update VitalPBX once you enter to ensure that you are using the latest version. To update you must go to the upper right of the screen, click on Adminsitrator and Check for Updates, register and then click Check for Updates again.
Get to know about VitalPBX, our services and how we can help you achieve your goals in our official website.
The VitalPBX team is thrilled to announce the rollout of VitalPBX 4.1 R1, a significant update that brings cutting-edge features and improvements to your communication

PBX System Recognized for Industry Innovation Miami, Florida, 02/27/24 — VitalPBX announced today that TMC, a global, integrated media company, has named VitalPBX Unified Communications

Introduction The Private Branch Exchange, or PBX, has been a fundamental pillar in business communication for decades. As technology has advanced, so have the capabilities