dSIPRouter (Kamailio) With VitalPBX

VitalPBX dSipRouter Kamailio Integration

1.- Introduction

After a long research on the internet, googling everywhere. We decided to make a manual on how to install Kamailio together with its graphical interface, dSIPRouter, to integrate it with VitalPBX.

Due to the above, we took on the task of searching for the available information and putting it together into a single guide that makes life easier for people interested in implementing Kamailio with VitalPBX. The best knowledge is the one that is transmitted to others.

What is dSIPRouter?

dSIPRouter is a Web Management GUI for Kamailio based on use case design. It allows you to quickly turn Kamailio into a platform for a SIP/PJSIP Service Provider.

What is kamailio?

The Kamailio® SIP server is a leading Open Source software for building SIP services such as a SIP proxy, SIP Presence Server, SIP location server and much more. With a rich configuration language, modularity and continuous development Kamailio is the choice for building enterprise as well as carrier solutions. Kamailio runs on Unix and Linux systems, ranging from embedded systems to large scale multi-core servers.

2.- Recommendations

  1. Do not install dSipRouter on the same server where you have VitalPBX installed. Use a different server.
  2. Always try to install the latest version of dSIPRouter (https://dsiprouter.org/).
  3. In this manual we use Debian 10, however you can use Ubuntu or Centos 7.
  4. We assume that you already have VitalPBX 3 installed.

3.- Installation

3.1.- DSIPRouter Installation

     In this guide we are going to assume that you have already installed Debian 10, so we are going to start by installing dSIPRouter and its dependencies. To enter the Debian 10 console, you can use an ssh client such as Putty.

Make sure to set the hostname to a fully qualified domain name (FQDN) that has DNS records pointed to the server (like sbc.yourdomain.com) prior to installation. The average install time is between 4-9 minutes depending on the resources on your vm/server.

Note: You can add a “-b <version number>” to the end of the git command to install and specific version of dSIPRouter.

Install (Proxy audio (RTP) traffic)

  • root@dsipsouter:~# apt update && apt install -y git curl
  • root@dsipsouter:~# cd /opt
  • root@dsipsouter:/opt# git clone https://github.com/dOpensource/dsiprouter -b master dsiprouter
  • root@dsipsouter:/opt# cd dsiprouter
  • root@dsipsouter:/opt/dsiprouter# ./dsiprouter.sh install -all

At the end it will show us a message with the credentials, it is very important that you save them completely:

  • configuring RTPEngine service
  • — — — — — — — — — — — — — — — — — — — — — — — —
  • RTPEngine Installation is complete!
  • — — — — — — — — — — — — — — — — — — — — — — — —
  •  
  •       _  _____ _____ _____  _____             _
  •      | |/ ____|_   _|  __ \|   __ \           | |
  •    __| | (___   | | | |__) | |__) |___  _    _| |_ ___ _ __
  •  / _` |\___ \   | | |  ___/|  _  // _ \| | | | __/ _ \ ‘__|
  • | (_| |____) |_| |_| |    | | \ \ (_) | |_| | ||  __/ |
  •  \__,_|_____/|_____|_|    |_|   \_\___/ \__,_|\__\___|_|
  •  
  • Built in Detroit, USA – Powered by Kamailio
  •  
  • Support can be purchased from https://dsiprouter.org/
  •  
  • Thanks to our sponsor: dOpenSource (https://dopensource.com)
  •  
  •  
  • Your systems credentials are below (keep in a safe place)
  • dSIPRouter GUI Username: admin
  • dSIPRouter GUI Password: sxOLp0nUdIG2iVMmUtbAeUm078bWQQkAVGD460PdLFu3vbNfIC8frIB7jlk3PSvN
  • dSIPRouter API Token: RIIbWNr1kFAmIupww5tQtvnrQBvT33on76WroXV4UXC48JE8f43zCKS0MdthFM4a
  • dSIPRouter IPC Password: V6J9F51YaAbD1v2x9JiawJIgvT6fpZUUx04N9tfDIrdXDf7xpyKKO9g4G9z7rll1
  • Kamailio DB Username: kamailio
  • Kamailio DB Password: OLAwmcYpEq17OQudll9aXKpTTNQF9a8Igx1HlGnfT3fzbAcqKbQhv5oR25qu8d7i
  •  
  • You can access the dSIPRouter WEB GUI here
  • External IP: https://147.182.137.69:5000
  •  
  • You can access the dSIPRouter REST API here
  • External IP: https://147.182.137.69:5000
  •  
  • You can access the dSIPRouter IPC API here
  • UNIX Domain Socket: /var/run/dsiprouter/ipc.sock
  •  
  • You can access the Kamailio DB here
  • Database Host: localhost:3306
  • Database Name: kamailio
  •  

We recommend installing sngrep

  • root@dsipsouter:~# apt-get install sngrep

sngrep is a tool for displaying SIP calls message flows from terminal.

It supports live capture to display realtime SIP packets and can also be used as PCAP viewer.

3.2.- Certificate Installation

If for any reason when installing dSIPRouter the installation of the certificate gave an error, we recommend running it again using the following command.

  • root@dsipsouter:~# certbot certonly –standalone –non-interactive –agree-tos -d yourdomain.org -m your@email.com

The certificates created are shown below

  • Saving debug log to /var/log/letsencrypt/letsencrypt.log
  • Plugins selected: Authenticator standalone, Installer None
  • Obtaining a new certificate
  • Performing the following challenges:
  • http-01 challenge for dsiprouter.new.vitalpbx.org
  • Waiting for verification…
  • Cleaning up challenges
  •  
  • IMPORTANT NOTES:
  •  – Congratulations! Your certificate and chain have been saved at:
  •   /etc/letsencrypt/live/dsiprouter.new.vitalpbx.org/fullchain.pem
  •   Your key file has been saved at:
  •   /etc/letsencrypt/live/dsiprouter.new.vitalpbx.org/privkey.pem
  •   Your cert will expire on 2021-10-04. To obtain a new or tweaked
  •   version of this certificate in the future, simply run certbot
  •   again. To non-interactively renew *all* of your certificates, run
  •   “certbot renew”
  •  – If you like Certbot, please consider supporting our work by:
  •  
  •   Donating to ISRG / Let’s Encrypt: https://letsencrypt.org/donate
  •   Donating to EFF: https://eff.org/donate-le

Take a note of these two files as we will use them later.

Then go to /etc/nginx/site-available and edit the dsiprouter.conf file

  • root@dsipsouter:~# nano dsiprouter.conf

Replace the Certificate with the one we generated in the previous step

  • # setup the dsiprouter server group (using unix sockets)
  • # if multiple instances are running they can be configured here
  • upstream dsiprouter {
  •     server unix:/var/run/dsiprouter/dsiprouter.sock;
  • }
  •  
  • # handle the https requests
  • server {
  •     # by default we listen on all interfaces
  •     listen 5000 ssl http2 so_keepalive=on;
  •     listen [::]:5000 ssl http2 so_keepalive=on;
  •     server_name _;
  •  
  •     ssl_certificate /etc/letsencrypt/live/dsiprouter.new.vitalpbx.org/fullchain.pem;
  •     ssl_certificate_key /etc/letsencrypt/live/dsiprouter.new.vitalpbx.org/privkey.pem;
  •  
  • . . . . . . . . .

Now, we proceed to restart the nginx service, and if everything is fine, it should not give any errors.

  • root@dsipsouter:~# systemctl restart nginx

Once the installation of dSIPRouter is finished, we will proceed to enter through the URL that was shown at the end of step 3.1.

4.- Setting Up

Now we enter the interface with the URL and credentials that it showed us at the end of the installation.

VitalPBX dSipRouter Kamailio Login

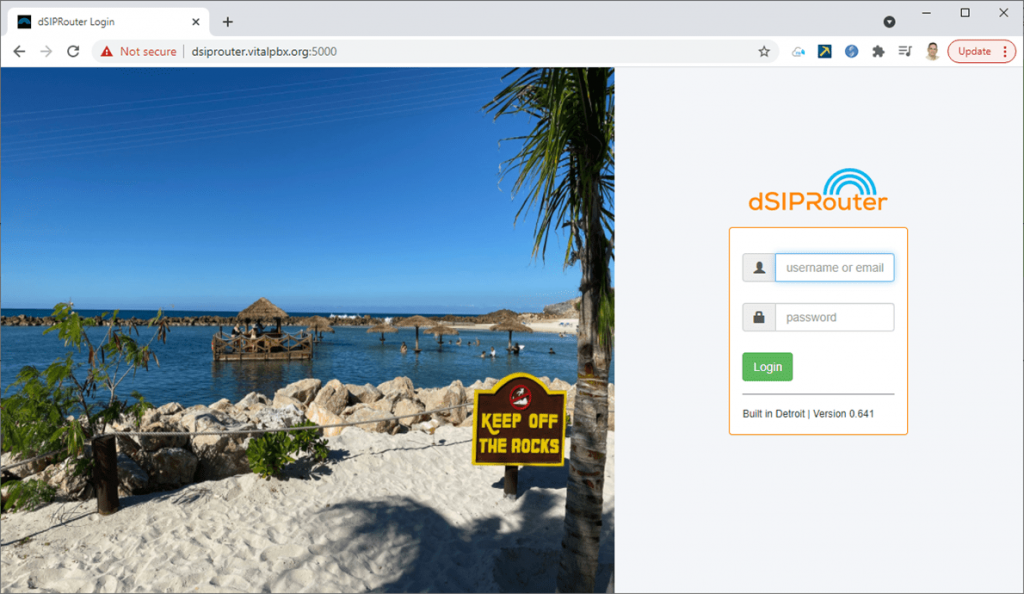
If everything is fine, the following screen will appear

VitalPBX dSipRouter Kamailio Dashboard

Now, we will proceed to the configuration starting from the fact that we already have our VitalPBX installed on another server and that it is accessible from our dSIPRouter server.

4.1.- Create Endpoint Groups

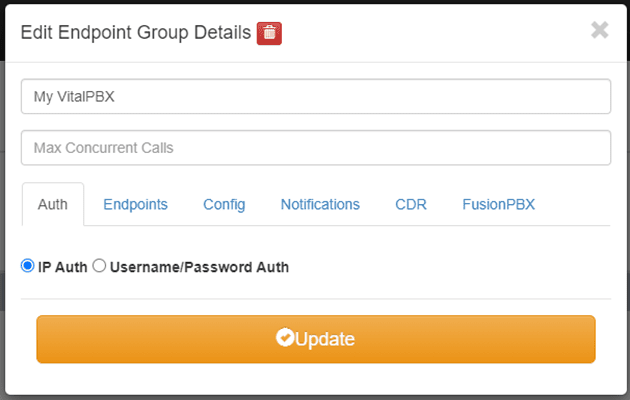
We go to the menu on the left and press “Endpoint Groups.” Then, press the Add button that is shown at the top right, and the following form will appear:

VitalPBX dSipRouter Kamailio Endpoint Creation Auth

  • Friendly Name (Optional), here we write a name to remember this group, for example “My VitalPBX”.
  • Max Consurrent Calls, here we can limit the maximum number of concurrent calls that we are going to accept on the VitalPBX server. Very useful for load balancing.
  • Auth, We select IP Auth option.

VitalPBX dSipRouter Kamailio Endpoint

  • Endpoints, we move to the Endpoints tab and press Add Row
    • Hostname/IP, the ip of our VitalPBX.
    • Description, short description to remember.
    • Weight, it is used for load balancing. Leave blank.

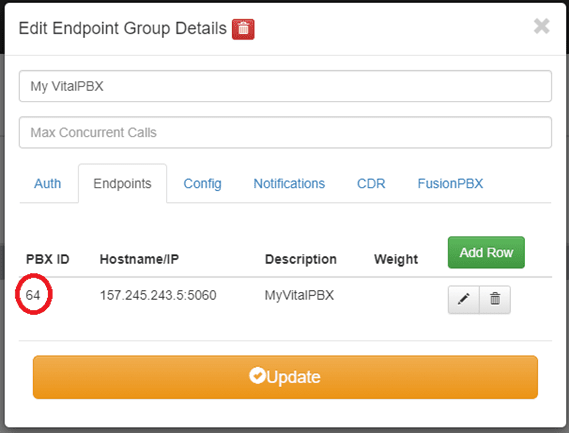
Now we proceed to press the Add button and we write down the PBX ID that is self-generated since later we will occupy it.

4.2.- Creation of Domains

Now we return to the menu and press Domains and then the Add button that is at the top right and the following form will appear:

VitalPBX dSipRouter Kamailio Create Domain

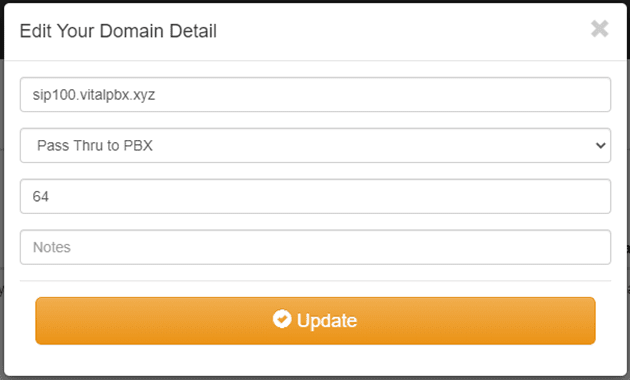
In the first field of domainA.com, we must put any domain that we are going to handle internally between dSIPRouter and VitalPBX, this domain that we write here is the one that we are going to use as the domain to register the phone. Note that in this scenario it is also necessary to declare our SIP Proxy on the phone, which would be the IP or Domain of our dSIPRouter.

  • domainA, our domain for internal use to redirect the record to one of our VitalPBX.
  • Select Domain Type, here we select “Pass Thru to PBX”, which guarantees that all traffic will go directly to our VitalPBX.
  • PBX ID’s, here we write the ID that we copied when we created the Endpoint Groups.

Finally, we press Add.

Now we do a reload of Kamailio by pressing the top right button

VitalPBX dSipRouter Kamailio Reload

Note:

If we want to use the same dSIPRouter server to protect several VitalPBX we must repeat step 4.1 and 4.2 with the values of the new VitalPBX. The new name of the SIP Proxy must be different so that when an extension is connected it knows to differentiate which VitalPBX the dSIPRouter is going to redirect.

4.3.- VitalPBX Configuration

Now we go to our VitalPBX and configure the following:

4.3.1.- Device Profile

We go to SETTINGS/Technology Settings/Device Profile and create a new profile that can be called “PJSIP dSIPRouter” and configure it as shown below:

Outbound Proxy: here you must write the domain or IP of our dSIPRouter server in the following format: sip:dsiprouter-ip;\lr
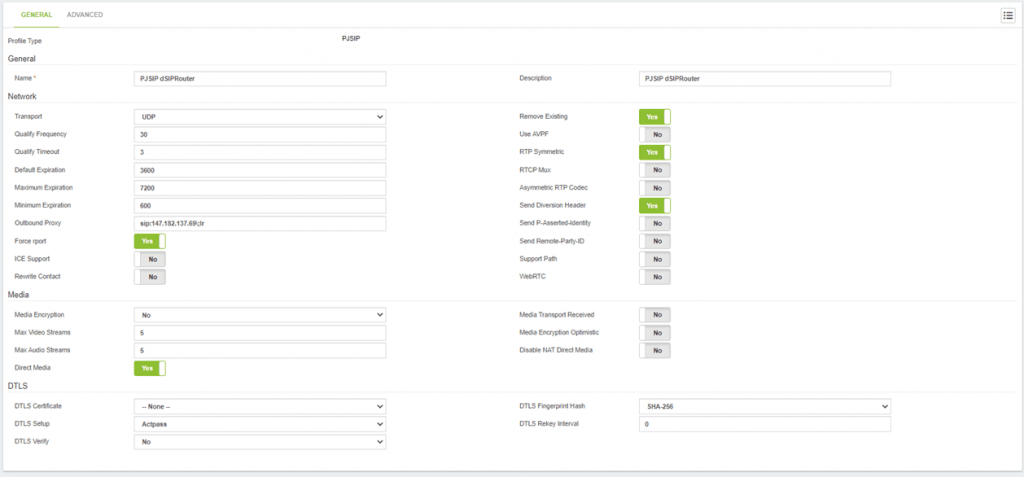
VitalPBX dSipRouter Kamailio PJSip Profile

Rewrite Contact: No

We save and apply changes.

4.3.2.- Firewall

Now we go to ADMIN/Firewall/Settings and add the IP of dSIPRouter in WHITELIST.

4.3.3.- Create Extensions

Now we go to PBX/Extensions/Extensions and create our first PJSIP type extension with the previously created profile (“PJSIP dSIPRouter”).

4.3.4.- Phone Settings

Now we will proceed to configure our phone, in our case it is a Yealink T58A.

VitalPBX dSipRouter Kamailio Yealink Account

  • Server Host, the created domain is configured in Domains of dSIPRouter.
  • Outbound Proxy Server 1, the domain or IP of our dSIPRouter server is configured.

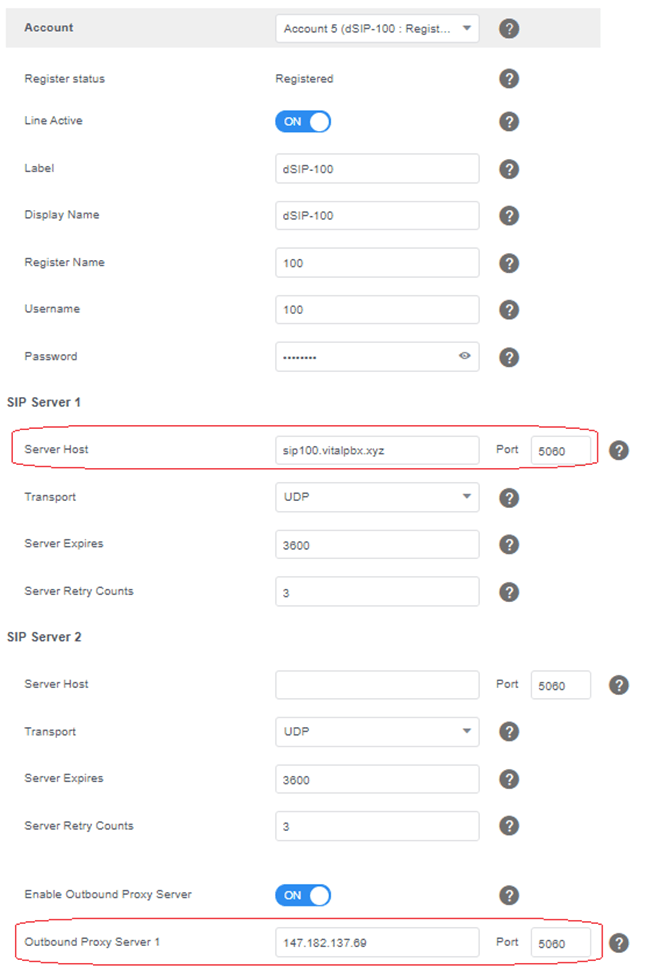
The demo parameters are the ones that we always configure in a SIP account of a phone.

5.- Security

Now, we are going to add an extra security in both servers for which we will follow the following steps.

5.1.- Limit SIP / PJSIP connections

Because we are only going to allow SIP/PJSIP connections from dSIPRouter, we are going to configure the firewall in such a way that only these types of connections are allowed from the dSIPRouter server.

We go to our VitalPBX server, ADMIN > Firewall > Rules, and select the SIP and PJSIP rules.

VitalPBX dSipRouter Kamailio PJSip Firewall Rule

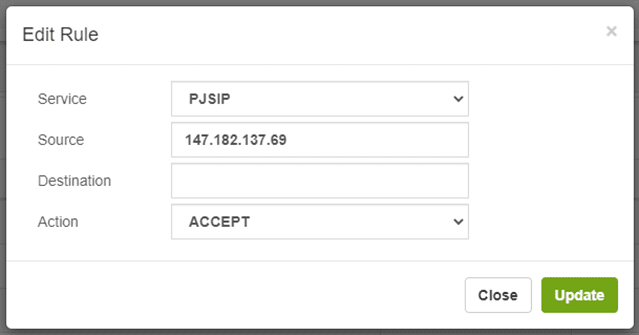
In the Source field we write the IP of our dSIPRouter server.

5.2.- Change ssh ports on both servers

It is very important to avoid ssh connection attempts, because the default port is 22, all attacks are directed to this port, so we will proceed to change it.

5.2.1.- Change ssh port (VitalPBX) Centos 7

To change the ssh port in VitalPBX it is necessary to first add in the VitalPBX firewall access from any IP to the new port, for which we go to ADMIN/Firewall/Service and add a new rule that can be called ssh-my- port.

VitalPBX dSipRouter Kamailio Firewall SSH Service

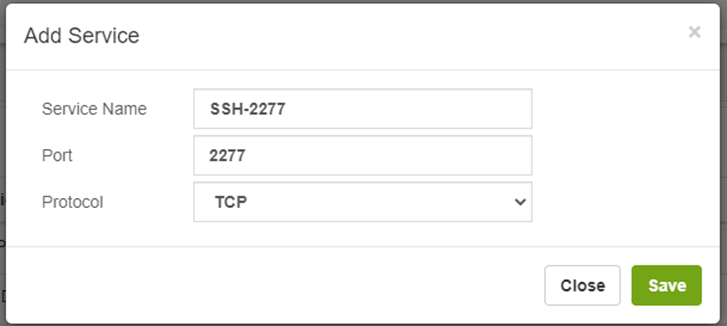
Later we go to ADMIN/Firewall/Rules and add the rule associated with this service.

VitalPBX dSipRouter Kamailio Firewall Rule

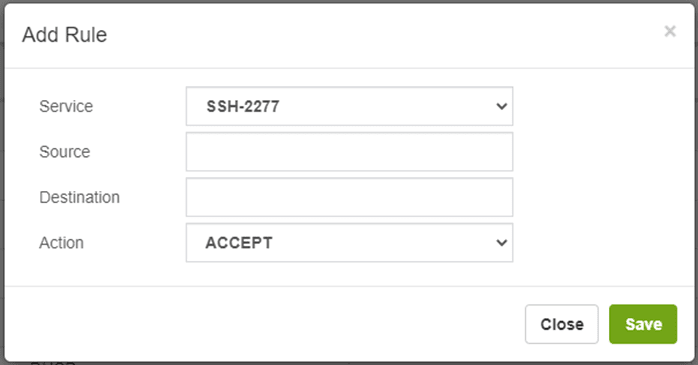
Now we apply changes.

We proceed to the console and edit the /etc/ssh/sshd_config file

  • root@vpbx ~# nano /etc/ssh/sshd_config

Locate the line “#Port 22”, remove the “#” and replace the 22 with the new port, it should look like this:

  • # $OpenBSD: sshd_config,v 1.100 2016/08/15 12:32:04 naddy Exp $
  •  
  • # This is the sshd server system-wide configuration file. See
  • # sshd_config(5) for more information.
  •  
  • # This sshd was compiled with PATH=/usr/local/bin:/usr/bin
  •  
  • # The strategy used for options in the default sshd_config shipped with
  • # OpenSSH is to specify options with their default value where
  • # possible, but leave them commented. Uncommented options override the
  • # default value.
  •  
  • # If you want to change the port on a SELinux system, you have to tell
  • # SELinux about this change.
  • # semanage port -a -t ssh_port_t -p tcp #PORTNUMBER
  • #
  • Port 2277
  • #AddressFamily any
  • #ListenAddress 0.0.0.0
  • #ListenAddress ::
  •  
  • ……………..

Now restart the ssh service

  • root@vpbx ~# systemctl restart sshd

We already have secured our server a bit more at the SSH level.

5.2.2.- Change ssh Port (dSIPRouter) Debian 10

We proceed to the console and edit the /etc/ssh/sshd_config file

  • root@dsipsouter:~# nano /etc/ssh/sshd_config

Locate the line “#Port 22”, remove the “#” and replace the 22 with the new port, it should look like this:

  • # $OpenBSD: sshd_config,v 1.100 2016/08/15 12:32:04 naddy Exp $
  •  
  • # This is the sshd server system-wide configuration file. See
  • # sshd_config(5) for more information.
  •  
  • # This sshd was compiled with PATH=/usr/local/bin:/usr/bin
  •  
  • # The strategy used for options in the default sshd_config shipped with
  • # OpenSSH is to specify options with their default value where
  • # possible, but leave them commented. Uncommented options override the
  • # default value.
  •  
  • # If you want to change the port on a SELinux system, you have to tell
  • # SELinux about this change.
  • # semanage port -a -t ssh_port_t -p tcp #PORTNUMBER
  • #
  • Port 2277
  • #AddressFamily any
  • #ListenAddress 0.0.0.0
  • #ListenAddress ::
  •  
  • ……………..

Later we add a new rule to allow ssh connections through the new port.

  • root@dsipsouter:~# iptables -A IN_public_allow -p tcp -m tcp –dport 2250 -m conntrack –ctstate NEW,UNTRACKED -j ACCEPT
  • root@dsipsouter:~# iptables-save > /etc/iptables.up.rules

Now restart the ssh service

  • root@dsipsouter:~# /etc/init.d/ssh restart

We now have secured our server a bit more at the SSH level.

We hope you succeed in this implementation. Feel free to contact us through our forum if you have any questions, https://forums.new.vitalpbx.org.

Note:

Source of information: dSIPRouter website, Kamailio website

Thanks to Luciano Moreira who shared very valuable information to make this Blog.

Our Latest Post

How-To
VitalPBX Content

How to Create An OpenAI API KEY

Introduction Obtaining an API Key from OpenAI is a critical step toward unlocking the power of artificial intelligence in your projects, especially if you’re interested

Read More »